
Content types are a very useful feature of SharePoint 2010 (and earlier versions), especially in regards to organising your documents and content. In effect a content type is a type of generic SharePoint content for example when you click on the new document option in a document library, you are using a document content type, the same is true of forms and list items amongst others. Content types are especially useful if the site requires a frequently used type of set document or list item, the example I am going to use in this article is holiday form.
To view the various content types available in SharePoint 2010 simply go to Site Actions à Site Settings à Site Content Types.

If you select one of the content types in the above list you will see a number of options, the areas which are perhaps are key are the Workflow Settings, Information Management Policy Settings and The Columns Section. These give an indication of how powerful content types can be, for example workflows can be associated to a content type, so that wherever this content type is used within the site the workflow can be attached and activated, this is a nice feature as it saves a considerable amount of time in terms of development and supporting workflows, also as a document library, form library or list can contain multiple content types it provides a simple mechanism to provide different workflows depending on the content type selected. The same is true of the information management policies.
In this article I am going to concentrate on the columns section as this allows us to define specific columns to a content type and whenever this content type is added to a document library/list these columns will also automatically be added.
How to Create a New Content Type
Let’s start by creating a new content type, we can do this by going to the Site Actions à Site Settings à Site Content Types à Create option.
We should now see a screen similar to the one shown below.
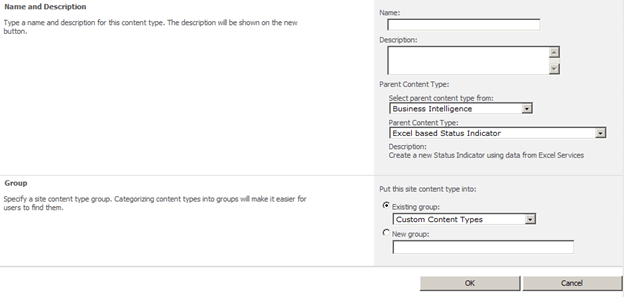
Figure 1.2 Site Content Types Basic Settings
In this screen we can enter the core information regarding the new content type, such as its name, description, parent and group. As I am going to create a Holiday Request Form, I use the following details.
Name: Holiday Request Form
Description: Form used to submit holiday requests
Select Parent Content Type From: Document Content Type
Parent Content Type: Document
New Group: Demo Content Types
I think that the name and description fields are self-explanatory; however the Select parent content type from and parent content type may need a little explanation. An important feature of SharePoint 2010 content types is the fact that individual content types can be inherited from to create new content types. In this way we can easily build up a hierarchy of content types which match the existing structure and hierarchy of your organisations documents. In this example I am using the default document content type, which will create a content type based on a standard blank Word, Excel, PowerPoint document. There are other options which could be selected such as PerformancePoint, Digital Assets and Folder options. The option to use an existing group or create a new group does not have any real effect on the content type however from an administrative perspective it is useful to add our content types into an organisational group, this makes it easier to find our content types later on. So in this example I have created a new group called Demo Content Types.
When we click on ok the following screen will be displayed.
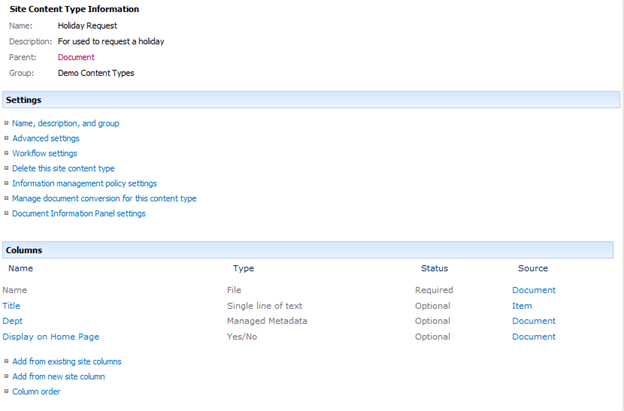
Figure 1.3 Content Type Information Screen
As you can see from the above screen shot, you have a number of options available to use with content types, for example you have the ability to add metadata columns to you content type. This is an important feature as this allows us to create some columns which provide specific information about our document/form, the addition of columns works in exactly the same way as it does for document library and lists, the interesting point here is that when a document is created from a content type and stored in an enabled document library the columns created here will be added to the document/form library or list. You will notice that this content type has two additional columns, I created these against the base content type and are not relevant to this example, but it does show the hierarchical nature of content types.
So currently we have a content type which when used will open a blank document, whilst this could be useful I want this content type to use a different document template. To do this go to the advanced settings option and the following screen should be displayed.
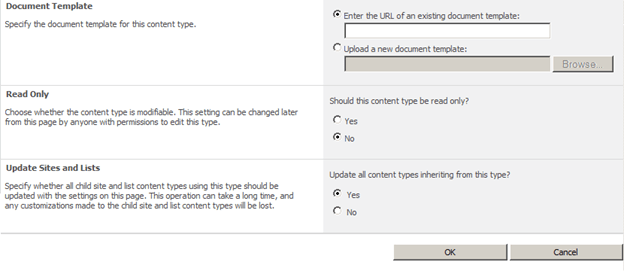
Figure 1.4 Content Type Advanced Settings
The advanced settings screen allows us to change the default document which is associated with this content type. There are two ways of doing this the first is to provide a URL to an existing document template, the other is to upload a document directly. You also have the option to mark this as read only, and the option to update all content types which inherit from this content type.
Once we are happy with these settings click on the ok button.
There are some other options which can be configured from the content type settings screen including, workflows, document information panel settings and information management policy settings, I will not cover these in this article but I may revisit these at a later time.
Anyway we now have a content type created with a new document template, but how do we use this within are SharePoint Site. To do this open a document library and go to the library settings. From here we have to complete two steps, firstly go to the advanced settings of the document library and set the Allow management of content types to yes (the default is no) and click on OK.

Figure 1.5 Document Library Settings – Allow Management of content types
We should now see the following section appear on the document library settings screen.
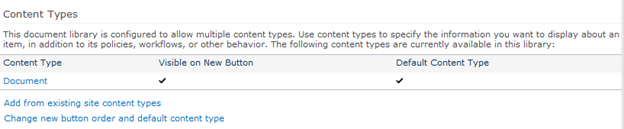
Figure 1.6 Document Library Settings – Content Types
There are two new options displayed in this section, first we need to go to the Add from existing site content types option
so that we can add our newly created content type. After selecting this option the following screen will be displayed.
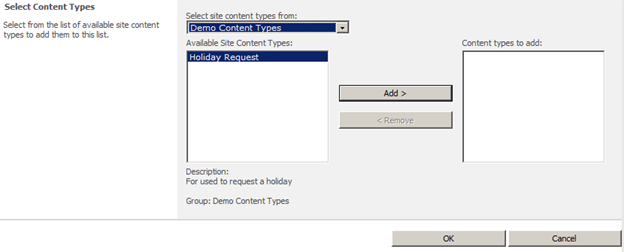
Figure 1.7 Document Library Settings – Add existing content type
This is where the option to add the content type to a group or to create a new group bears fruit as it means we can select the group from the drop down, which then filters the available content types in the list. Click on the content type we want to use and then click on the add button, when ready click on OK. The newly added content type will now be showing in the list of content types.
We should now see that both of the content types listed will have a check mark against them to indicate that they are visible on the new button of the document library. Now it might be that this is ok, but we can hide the default new document option on the document library. To do this click on the change new button order and default content type option. This will bring up the following screen.

Figure 1.8 Document Library Settings – Change New Order and Default Content Type
Depending on the requirements we might have, we can uncheck the visible option or we could just change the position from top. Once we are happy with these settings we just need to click on the OK button.
Now if we navigate to the document library we can see that our document library now has only the option to create new Holiday Requests.
We can do a lot more with content types than is covered in this article, but hopefully this has provided an introduction and an overview of what can be achieved using content types.

Nice one…….!!!!
LikeLike